

Are you or your client considering moving to AEM as a Cloud Service (AEMaaCS)? There are many advantages of the fully managed and automated environments AEMaaCS offers. But one of the things you need to consider is the need for a multi-tenant setup. If you currently have a multi-tenant setup, moving to AEMaaCS will most likely require some changes.
With on-prem AEM installations, you could have a separate repository for each tenant website, where you would just install a separate code package for each tenant (be it manually in the Package Manager or via a CI/CD pipeline in a tool of your choice). This is a standard procedure that works very well. Unfortunately, this model will not work in AEMaaCS.
The deployment pipelines configured in the Cloud Manager only support a single Git repository in AEMaaCS. And, you can only have one code deployment pipeline per environment. This means that all the code being deployed to a given environment must be coming from a single Git repository.
Fortunately, there are several ways you can fulfill the requirement of deploying from a single Git repository and still have a multi-tenant setup. In this blog, we’ll discuss the basic multi-tenant model for AEMaaCS.
Basic Multi-Tenant Model for AEMaaCS Utilizing Git Submodules
Consider this scenario:
- There are two different websites that need to be deployed to the same AEM instance
- Each website has its own development team
- There is no overlap between the websites
- Each team wants to work in their own repository without the other team having access to it
Repository Setup
The most straightforward model that allows for a multi-tenant setup in AEMaaCS is utilizing Git submodules. Within this model, each tenant has its own Git repository with the standard Maven multi-module project for AEM (created from the Maven archetype, available from Adobe).
Because there are multiple tenants that deploy their code to the same AEM instance, we also need a separate repository (and Maven project) dedicated to common code, OSGi configurations, and dispatcher configuration files – anything that is either shared across all the tenants or is defined at the instance level. This repository (and project) is not strictly necessary but is a good idea. It allows for better separation of concerns and better governance across tenant teams.
The last piece of the puzzle is the main repository that combines the other repositories (and Maven projects) into a single repo that can be used for code deployments. This repository is the “shell” repo that pulls in the other repositories as Git submodules. It must contain the .gitmodules file that defines the Git submodules and the pom.xml file. This main repo might also contain other files, like YAML files defining your custom pipelines or Cloud Manager config files contained within the .cloudmanager folder.
Here is a diagram of what these repos look like.
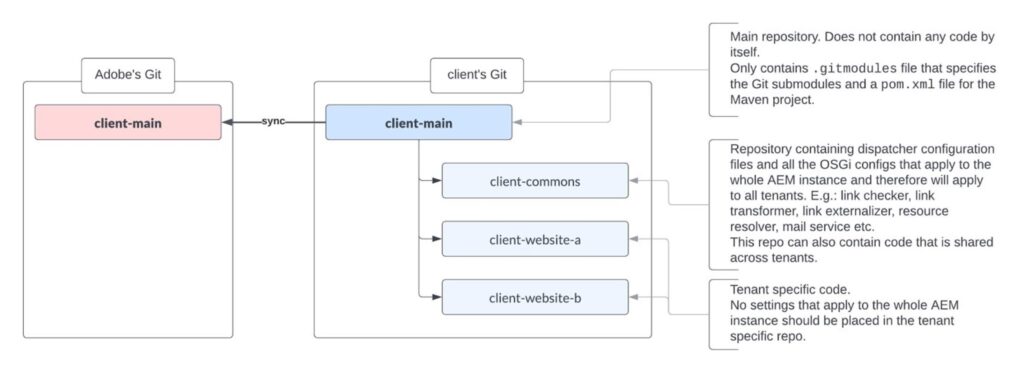
You will likely want to have all these repositories in your own Git and only sync up the main “shell” repository to Adobe Git.
client-commons, client-website-a, and client-website-b are all independent repositories and Maven projects. You should be able to deploy each project separately (to your local AEM instance, for example). These are the repositories, where any updates should be made.
client-main is the main repository that pulls in the other repositories as Git submodules. Even though you can see files within the submodules within this main repo, you should not be changing any of these files.
Adding Git Submodules to the Main Repository
First, you must designate your client-commons, client-website-a, and client-website-b independent repositories as Git submodules of the client-main repository.
It is easy to add a new submodule to the main project/repo:
- Run the following command from the top-level folder in the client-main project:
git submodule add <REPO_URL>
where <REPO_URL> is the URL to the repository you want to add as a submodule
After running the git submodule add command first time, a new .gitmodules file is created. Open the .gitmodules file and notice that a new submodule was added. Run the git submodule add command for each submodule you want to add to the main repository. In our case, we will run the git submodule add command three times: for client-commons, client-website-a, and client-website-b repositories.
- You can edit the .gitmodules file and add/update the branch for each submodule.
- Run the sync command to sync files from the submodules into the client-main repo
git submodule update --recursive --init --remote commitandpushyour updates.
Here is what the .gitmodules file looks like (here, coming from the ‘develop’ branch):
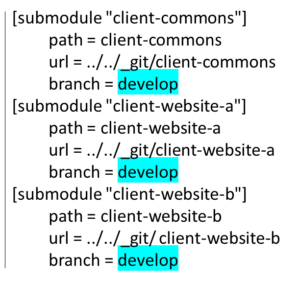
A quick note about the branch name within the .gitmodules file. Each of your repositories will likely have at least two branches (probably many more) – the standard ‘develop’ and ‘main’ branches. The branch name of the Git submodule within the .gitmodules file should correspond to the branch within the main repo. It basically tells Git which branch to pull from the repository defined as the Git submodule.
You can edit the .gitmodules file and update the branch for each of the submodules.
Here is what that same .gitmodules file would look like when coming from the ‘main’ branch:

Within the main repo, you must add a pom file that lists all Git submodules as Maven modules.
Here is what the pom.xml file looks like for the client-main repo:

Deploying the Code to Your Local Environment
After setting up your local environment, you must install the code. You can run the build command form the client-main repo (this is what the Cloud Manager code deployment pipeline does). It will install code packages for each of the submodules.
You can also clone the client-commons repo and your own tenant repo and run the build command from those repos separately.
You must clone your tenant repo if you intend to make any changes.
Any code changes should be made in the individual submodule repos, not in the client-main repo.
Working with Git Submodules
Developers normally work in their tenant repo and sometimes in the client-commons repo. They commit as usual and push their commits to the remote. The commits that have been pushed to the remote should be synced to the client-main repo (in the client’s Git). That sync can be done after every commit to the branch configured within the .gitmodules file, or before deployment to AEM.
Syncing Updates From Submodules to the Main Repo (in Client’s Git)
Here is what is involved:
clone(orpullfrom) the client-main repo and make sure there are no local changes- Run the following command to get the latest changes from the submodules:
git submodule update --recursive --init --remote commitandpushthe updates to the remote
Now the client-main repo has all the latest changes from the submodules.
This process can be automated with a CI/CD pipeline.
Before deployment to the AEMaaCS environment, the latest updates from the client-main repo in client’s Git need to be synced to the corresponding client-main repo in Adobe’s Git.
Syncing Updates From the Main Repo in the Client’s Git to the Corresponding Repo in Adobe Git
Both repositories are exactly the same, so the repository in Adobe Git could be set up as a mirror. Changes will happen only in the client-main repo in the client’s Git. This process can be automated with a CI/CD pipeline.
Adding a new tenant
It is easy to add a new tenant to the main project. The steps are the same as when the initial Git submodules were added to the main repo.
- Create a repository for the new tenant. Don’t include any settings that apply to the whole AEM instance as those should be discussed with developers from the other tenants and added to the client-commons repository.
clone(orpullfrom) the client-main repo, make sure there are no local changes- When the new tenant codebase is ready to be added, run the following command from the top-level folder in the client-main project:
git submodule add <REPO_URL>
where <REPO_URL> is the URL to the repository you want to add as a submodule. - Open the .gitmodules file and update the branch for the new submodule, if it should be different from what was already there.
- Run the sync command to sync files from the submodules into the client-main repo
git submodule update --recursive --init --remote commitandpushthe updates to the remote
Dispatcher configurations
The last piece to the successful multi-tenant model is the dispatcher configurations. Each tenant should define its own farm and vhost and, from there, tenant-specific filters, cache rules, client headers, and rewrite rules.
Wrap-up
Even though the multi-tenant model discussed above is one of the most basic ones, it might still be challenging to set up. While you, hopefully, now understand this model and how to set it up, questions may still arise during the process.
There are many other related topics to explore. Stay tuned for more about the deployment pipelines within Cloud Manager, the dispatcher setup details, and the CI/CD pipelines for syncing the repositories.
Make sure to also check out this related article: Multi-Tenant Deployment Strategies in AEM with Adobe Cloud Manager.