

“Einstein for Developers” refers to the set of artificial intelligence (AI) and machine learning (ML) tools and features available for developers within the Salesforce platform. Salesforce Einstein is designed to help Salesforce developers build smarter, more predictive, and more automated applications that enhance their CRM and business processes.
Einstein for Developers is a generative AI tool designed specifically for Salesforce code languages. It is built using Salesforce’s global Code-Gen which is Salesforce’s open-source Large Language Module (LLM). Currently, the Einstein for Developers is available in “Beta”.
So, let’s go through a few easy steps.
How to Setup Einstein for Developers:
Step 1: Enable Einstein for Developers in org: –
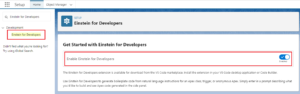
The first step is to enable the “Einstein for Developers” option in the org.
- Go to the setup.
- Enter “Einstein for Developers” in the quick find box and select.
- Enable the “Einstein for Developers” option as shown below.
Step 2: Setup Einstein for Developers Extension: –
To set up the extension in the Visual Studio Code, follow the step-by-step process described below.
- Open the Visual Studio Code.
- Search “Einstein for Developers” in the extensions or you can directly press “Ctrl + Shift + X” and search for it.
- Install the extension as shown in the figure below.

Note: This is mandatory step for using Einstein for Developers in VS. Without this Einstein icon(in step 4) won’t be visible in your VS code project.
Step 3: Create a project:
- Open the command palette or press “Ctrl + Shift + P”.
- Select or type the command “SFDX: Create Project”.
- Select “Standard” and enter the Project name.
- Select the folder and press enter.
In this way, you’ve created the project in VS Code.
Step 4: Authorize an org:
- Open the command palette or press “Ctrl + Shift + P”.
- Select or type the command “SFDX: Authorize an org”.
- Select Project Default. (You can also choose other options according to the requirements.)
- Enter the org name or org alias and press enter.
- Enter the credentials and authorize your org.
In this way, you’ve authorized your org too.
If you’re already done with creating a project and authorizing the org, you can skip step 3 and step 4 respectively.
Once you are done with creating a project and authenticating an org, an Einstein icon will be visible as “Einstein Sidebar” on the left as shown in the figure below.
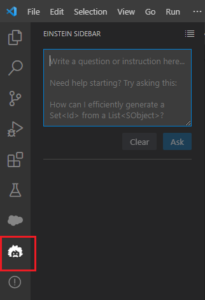
There are two ways to generate a code in the VS Code with the help of Einstein for Developer. Let’s go through both.
Note: The current capability of Einstein for Developer is to use only in “Apex”. After the upcoming releases, it will be possible to use Einstein Developer for LWC also.
Way 1: Generate code in the Einstein Sidebar Prompt –
You need to simply write instructions in the Einstein Sidebar prompt and click on the “Ask” button. It is similar to the ChatGPT.
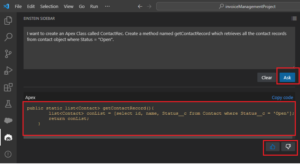
You can see, we have provided the instructions in the prompt and clicked on “Ask”. Immediately, the “Einstein for Developer” extension generates the code for the user. Here, it is also provided with a “Like” and “Dislike” button below the answer to express the view or satisfaction of the user.
Note: What happens sometimes is that even if you provide instructions in the prompt, it fails to generate an answer. So that time, try to change the provided instructions or write it in a different manner. It’s a matter of “how well you write your prompt.”
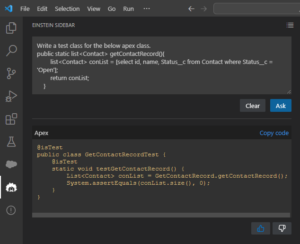
Test Class:
Let’s write a test class for the above Apex class.
Way 2: Generate code using command palette –
The other way is to write the instructions in the command palette.
- Create an apex class or you can use the existing one. (Delete the class name and method name if the VS code is automatically generated for you.)
- Open the command palette and search “Einstein: Generate Code” as shown below.
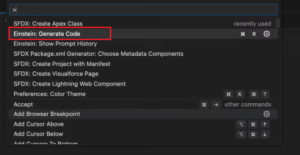
- Select “Einstein: Generate Code”.
- Write the instructions there for the Einstein extension.
- Press Enter.
It will generate the apex class for you. The answer consists of three options: Accept, Try Again, and Clear.
Note: Do not use this extension in your actual project unless you get permission. Else you can use it in your normal VS code projects in your pc.
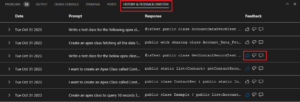
Einstein: History & Feedback: –
There is a new tab added with the Einstein extension is “History & Feedback” to the terminal.
If you are not able to see it in the terminal window then open the command palette, search, and select “Einstein: Show Prompt History”.
Here you can see the previous results and codes. Also, there is an option for “like and dislike” and send your feedback.
Benefits of Einstein for Developers:
There are many benefits of Einstein for Developers. A few of them are listed below.
- Efficient Data Analysis
- Time-Saving Solutions
- Simplified Development
- Improved Decision-making
- Accessibility and Integration
- Developer-Friendly Resources
So, these were the benefits of Einstein for Developers. And we’ve seen how to work with Einstein extension in VS Code.
Conclusion:
Einstein for Developers introduces a new era in application development within the Salesforce ecosystem. In this blog, we’ve explored the immense potential of “Einstein for Developers” to generate the code for developers in VS Code. Explored it’s features and advantages also.
Related Articles:
- Salesforce Einstein Basics
- Einstein and Generative AI
- Artificial Intelligence Technology and Resources
- Salesforce Einstein Chatbot